Homemade granola bars make snack time healthier, cheaper, and tastier. With homemade granola bars, you know exactly what’s inside—no hidden sugars or additives. Best of all, homemade granola bars stay chewy, crunchy, and full of natural flavor. Ready to learn why these easy bars beat store-bought every time? Let’s dive in.
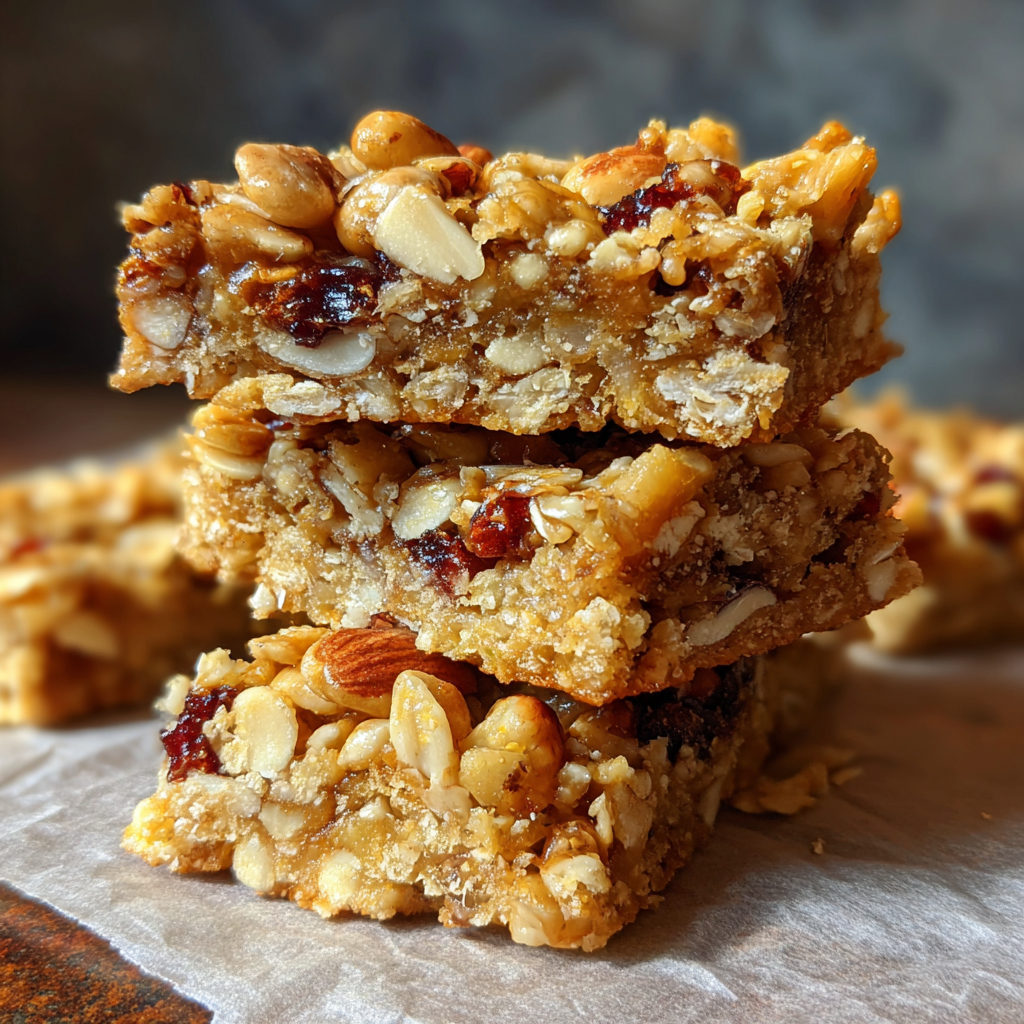
Table of Contents
Table of Contents

5-Ingredient No-Bake Homemade Granola Bars
- Total Time: 15 minutes + chilling
- Yield: 10 bars 1x
Description
Chewy, crunchy, healthier homemade granola bars made with just five pantry staples. Quick, customizable, and perfect for meal prep!
Ingredients
1 ½ cups rolled oats (use gluten-free if needed)
1 cup pitted medjool dates (about 12–15)
½ cup creamy peanut butter (or almond/sunflower butter)
½ cup roughly chopped almonds (or seeds)
¼ cup maple syrup (or honey/agave)
Instructions
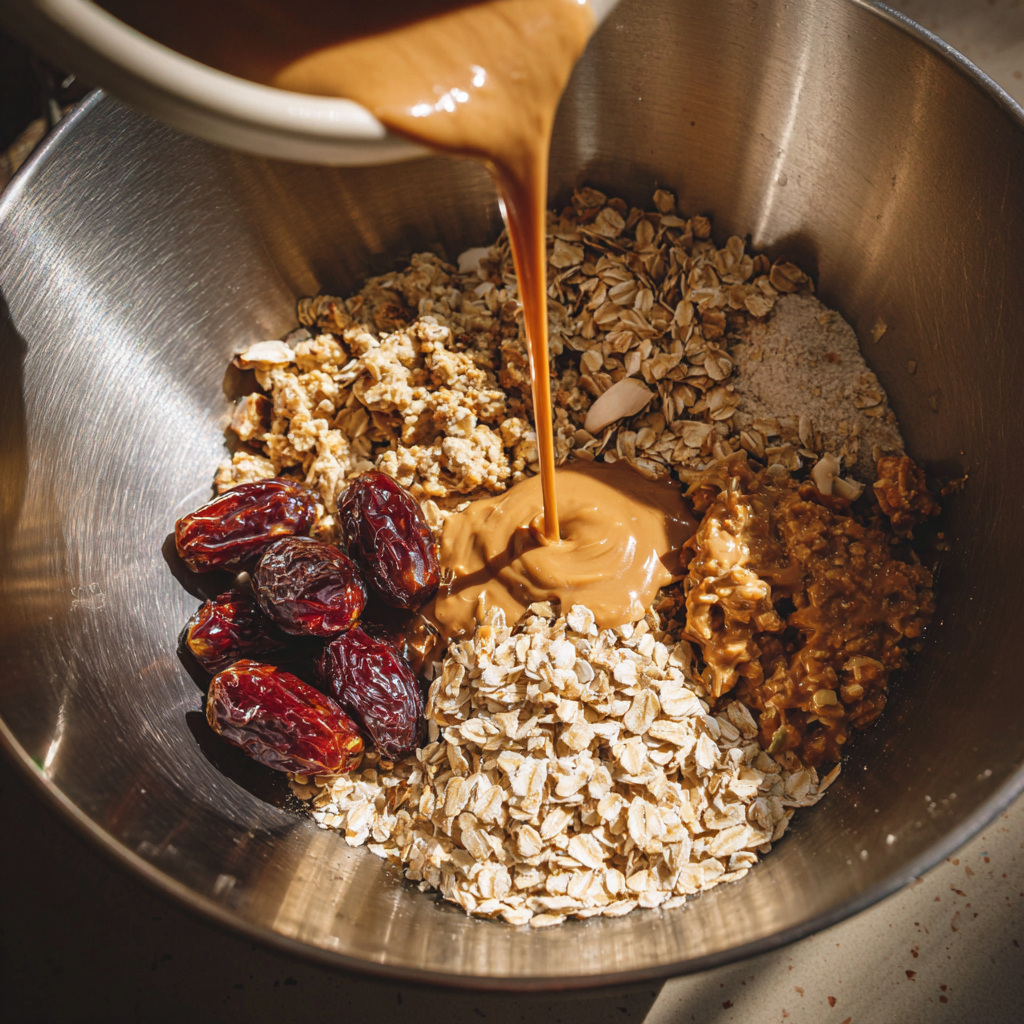
Prep dates: Blend or process dates into a sticky paste.
Mix dry: In a large bowl, combine oats and chopped almonds.
Warm wet: Gently heat peanut butter and maple syrup until pourable.
Combine: Add date paste and warm wet ingredients to the dry mix. Stir until evenly coated.
Press & chill: Press mixture firmly into a parchment-lined baking pan. Chill for 20–30 minutes.
Slice: Cut into bars. Store in the fridge for up to 2 weeks or freeze for up to 3 months.
Notes
Swap peanut butter with almond, cashew, or sunflower seed butter to make nut-free or change the flavor.
Press the mixture firmly to help bars hold together.
Add chocolate chips, dried fruit, or seeds to customize.
- Prep Time: 10 minutes
Nutrition
- Calories: 210 kcal
Why Homemade Granola Bars Beat Store-Bought
Are homemade granola bars better for you?
Homemade granola bars really do have the upper hand. When you make them at home, you skip the preservatives, refined sugars, and processed oils often hiding in store-bought bars. Instead, you get real ingredients like oats, almonds, dates, and peanut butter. That means every bite delivers natural fiber, healthy fats, and slow-releasing carbs to keep you satisfied for hours. Plus, you control the sweetness—using honey, maple syrup, or agave instead of high fructose corn syrup. So yes, homemade granola bars aren’t just better; they’re genuinely healthier.
Avoiding additives & hidden sugars
It’s easy to underestimate how many additives sneak into store-bought snacks. Emulsifiers, syrups, preservatives, and artificial flavors keep those packaged bars on the shelf longer—but don’t do your health any favors. Homemade granola bars avoid that trap. By making them yourself, you ensure every ingredient serves a purpose: taste, texture, and nutrition. Using simple swaps like gluten-free oats, unsweetened dried fruit, or nut butter keeps things customizable, too. That way, your chewy granola bars stay natural, delicious, and exactly how you want them.
Is It Cheaper to Make Your Own Granola Bars?
Cost breakdown: homemade vs store-bought
Ever wonder if homemade granola bars truly save money? Let’s do the math. A typical box of store-bought granola bars can cost anywhere from $4–$6 for just six small bars. That’s roughly 70–100 cents per bar. In contrast, when you whip up homemade granola bars, you buy ingredients like oats, dates, peanut butter, and almonds in bulk. A large bag of oats and a jar of nut butter stretch across several batches. The result? Your homemade granola bars often cost as little as 25–40 cents each—even when you choose premium add-ins like dried fruit or chocolate chips.
Savings tips when making granola bars
Here’s how to keep your homemade granola bars budget-friendly and tasty:
- Buy in bulk: Oats, nuts, and seeds get cheaper the bigger the bag.
- Use what you have: Substitute ingredients instead of buying special add-ins.
- Skip pricey mix-ins: Instead of fancy dried cherries, try raisins or chopped dates.
- Make bigger batches: Freeze extras so you’re not tempted to buy packaged bars later.
By following these tricks, your chewy, crunchy homemade granola bars stay wallet-friendly and healthier, too. And remember: saving money never has to mean sacrificing taste.
What Makes Granola Bars Stick Together?
Natural binders: honey, maple syrup, dates
So what’s the secret that keeps homemade granola bars chewy and holds them in perfect squares? It’s all about the binders. Natural options like honey, maple syrup, and sticky medjool dates do double duty: they add sweetness and glue everything together. For vegan homemade granola bars, maple syrup or agave syrup is your best bet. Dates are also a favorite; once blended, they become a thick paste that locks oats and nuts into place. The bonus? These natural binders add minerals and fiber, unlike refined sugars.
Best ratio of wet to dry ingredients
Too crumbly? Too sticky? The key to chewy, crunchy homemade granola bars is getting the wet-to-dry ratio just right. Think roughly 1 part wet (like peanut butter, honey, or dates) to 2–3 parts dry (oats, nuts, seeds). If your mix feels too dry, add a spoonful of nut butter or warm honey. If it feels too wet, sprinkle in more oats until it firms up. Always press the mix firmly into the pan before chilling—it helps everything stick better when you slice.
The Best Homemade Granola Bar Recipe (5-Ingredient No-Bake)
Ingredients & substitutions
At the heart of these chewy, crunchy homemade granola bars is a minimalist mix of five pantry staples:
- Rolled oats: The classic base for hearty texture.
- Medjool dates: Natural binder and sweetener.
- Peanut butter: Adds rich flavor and keeps everything together.
- Almonds: Crunch and healthy fats.
- Maple syrup (or honey/agave): Sweetens and helps bind.
Want to switch it up? Almond butter, sunflower seed butter, or cashew butter all work well. Keep it vegan by sticking to maple syrup or agave. And if you need gluten-free homemade granola bars, simply use certified GF oats.
Step-by-step: how to make no-bake granola bars
Making these homemade granola bars couldn’t be simpler:
- Prep the dates: Blend or process until they form a sticky paste.
- Mix: In a large bowl, combine oats, chopped almonds, and date paste.
- Warm wet ingredients: Gently heat peanut butter and maple syrup until pourable.
- Combine everything: Stir wet into dry until fully coated.
- Press & chill: Line a baking pan with parchment. Press mixture firmly into an even layer.
- Cut: Chill for about 20–30 minutes, then slice into bars.
That’s it—no baking, no fuss, and the homemade granola bars stay chewy, crunchy, and fresh for days.
Customizing Your Homemade Granola Bars
Vegan, gluten-free & nut-free options
One of the best things about homemade granola bars is how easy they are to customize. Want them vegan? Just use maple syrup or agave instead of honey. Need gluten-free homemade granola bars? Swap in certified gluten-free oats. Can’t have nuts? Go nut-free by replacing almond pieces with pumpkin or sunflower seeds, and peanut butter with sunflower seed butter or tahini. It’s all about mixing and matching until your chewy granola bars fit your taste and dietary needs.

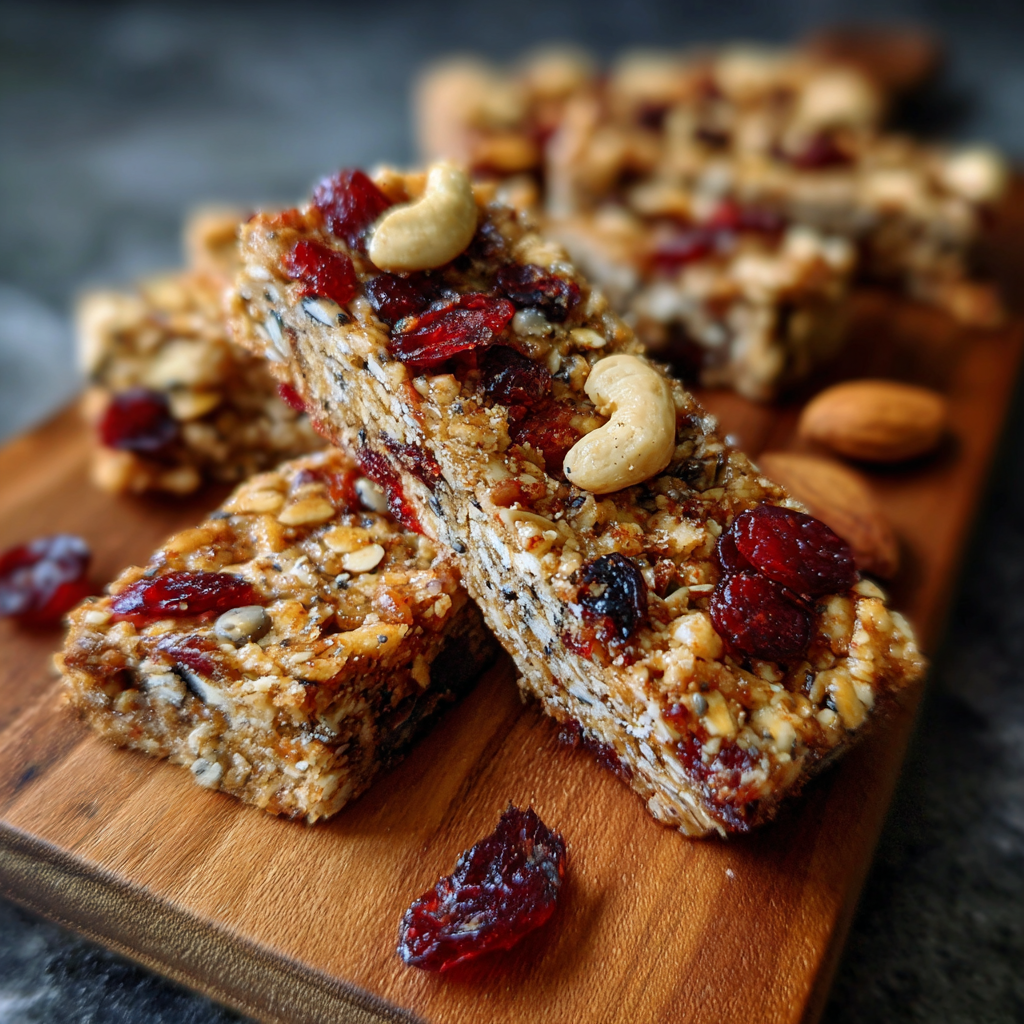
Fun add-ins: chocolate chips, dried fruit, seeds
Once you’ve nailed the classic chewy, crunchy texture, get creative! Fold in mini chocolate chips, shredded coconut, dried cranberries, raisins, or chopped apricots for natural sweetness. Sprinkle in chia seeds, flaxseeds, or hemp hearts to boost protein and fiber. Want more crunch? Add toasted coconut flakes or extra nuts. With homemade granola bars, the mix-ins make them uniquely yours—and you’ll never get bored.
Storing & Freezing Homemade Granola Bars
How long do homemade granola bars last?
Homemade granola bars store surprisingly well—making them perfect for meal prep. In an airtight container at room temperature, they stay chewy and fresh for about 1 week. Want them to last longer? Pop them in the fridge, where they’ll stay good for up to 2–3 weeks. Just remember: since homemade granola bars don’t have preservatives, they naturally won’t last quite as long as store-bought ones—but that’s a good thing!
Freezing tips & tricks
Need homemade granola bars to last months instead of weeks? Freezing is the answer. First, slice your bars and separate each piece with parchment or wax paper. Place them in an airtight freezer bag or container. Frozen homemade granola bars keep their chewy texture and crunchy edges for up to 3 months. To enjoy, simply thaw at room temperature for about 20 minutes, or pop one into your lunchbox in the morning—it’ll be ready by snack time.
Health Benefits of Homemade Granola Bars
Healthy fats, fiber & slow-releasing carbs
When you think about homemade granola bars, it’s easy to focus on taste alone—but there’s so much more going on in every bite. Thanks to ingredients like oats, nuts, and seeds, homemade granola bars deliver a powerhouse of nutrients that packaged bars often can’t match.
For starters, healthy fats from almonds, peanuts, or sunflower seeds help keep you full and satisfied. Instead of quick energy that crashes, these fats team up with the fiber in oats to slow digestion. That means a steadier energy release, fewer cravings between meals, and better focus throughout the day. Unlike many store-bought bars loaded with refined sugar, homemade granola bars get their sweetness naturally—from sticky medjool dates, honey, or maple syrup—which also brings along minerals and antioxidants.
Fiber plays a major role here, too. Each batch of chewy homemade granola bars packs soluble and insoluble fiber, supporting digestive health and helping you feel fuller with fewer calories. The best part? Because you choose the sweeteners and add-ins, you avoid those “hidden sugars” that can spike blood sugar.
Looking for inspiration? Discover why oats are the ultimate base in our complete guide to the benefits of oats. You’ll see exactly how they add texture, taste, and nutrition to every batch of homemade granola bars.
Great snack for kids & adults
Another big win? Homemade granola bars work for everyone—from little kids to grown-ups with busy schedules. They’re easy to pack in lunchboxes, stash in the car, or keep at your desk. And unlike packaged options that often include nuts or allergens, you can tailor each batch. Need nut-free homemade granola bars? Use sunflower or pumpkin seeds and swap in sunflower seed butter or tahini. Want them to be lower in sugar? Add fewer dates and more spices like cinnamon or vanilla for natural flavor.
For active teens, athletes, or parents on the go, homemade granola bars also offer a real advantage: you control the protein content. Stir in extra seeds or a scoop of protein powder for a post-workout snack that keeps muscles fueled and energy steady.
At the end of the day, making homemade granola bars isn’t just about saving money or skipping preservatives—it’s about building a snack you can trust. A chewy, crunchy bar that keeps your family satisfied, without empty calories or mystery ingredients.
Common Mistakes to Avoid
Bars too crumbly or too sticky
If your homemade granola bars turn out crumbly or fall apart when you slice them, you’re not alone. One of the most common mistakes is getting the wet-to-dry ratio off balance. Adding too many dry ingredients like oats, nuts, or seeds without enough “binder” (like peanut butter, honey, or date paste) can leave you with bars that don’t hold together. On the flip side, adding too much sweetener or nut butter can make them overly sticky, leaving a gooey mess instead of neat, chewy bars.
The fix? Start by measuring carefully. Remember: roughly 1 part wet ingredients to 2–3 parts dry usually does the trick. Always press your mix firmly into the pan with a spatula or even your hands before chilling. That pressure helps your homemade granola bars set properly, so they stay chewy and slice cleanly.
Over-baking or under-mixing
While no-bake homemade granola bars are easiest, some people love baked versions for a crispier finish. If you bake them too long, though, they can get hard as bricks. The key is to bake until just golden, then let them cool completely before cutting—cooling firms them up naturally. Skipping this cooling step often makes bars fall apart.
Under-mixing is another sneaky problem. If you don’t combine wet and dry ingredients fully, some parts of the bars stay dry and crumble while others get too sticky. Always stir until every oat is coated.
Finally, don’t rush. It might be tempting to cut your homemade granola bars straight from the fridge, but letting them rest 15–20 minutes at room temperature often makes slicing easier and keeps that chewy, crunchy texture you love.
Conclusion
At the end of the day, homemade granola bars truly check every box. They’re cheaper to make, endlessly customizable, and way healthier than many store-bought snacks packed with refined sugars and preservatives. Whether you like them chewy or crunchy, nut-free or packed with chocolate chips, you control what goes inside. That means more fiber, healthy fats, and real flavor in every bite.
Best of all? Homemade granola bars aren’t just for the kitchen pros—they’re quick, simple, and no-bake recipes mean anyone can whip them up. Make a big batch, freeze extras, and keep your pantry stocked with snacks that keep you satisfied for hours.
Homemade granola bars aren’t just better—they’re the smarter, tastier, and crunchier choice your snack routine has been waiting for.
For mor recipes follow me in instagram and facebook.
FAQs About Homemade Granola Bars
Is it cheaper to make your own granola bars?
Yes! Making homemade granola bars often cuts costs nearly in half compared to buying boxed brands. When you buy ingredients like oats, peanut butter, and dates in bulk, your cost per bar drops to around 25–40 cents each—compared to $1 or more for packaged bars. Plus, you get bigger batches, better flavor, and no fillers. It’s real savings without sacrificing taste.
What makes granola bars stick together?
The secret behind chewy, crunchy homemade granola bars lies in natural binders. Sticky medjool dates, warm honey, maple syrup, or agave syrup all act like edible glue, holding oats and nuts together. Pair them with creamy nut butter, and your bars won’t fall apart. Pressing the mixture firmly into the pan and chilling helps everything set perfectly.
Are homemade granola bars better for you?
Absolutely! Homemade granola bars skip the preservatives, artificial flavors, and refined sugars found in many packaged bars. Instead, they’re loaded with real ingredients: fiber-rich oats, protein-packed nuts and seeds, and natural sweeteners. You control the sugar content, the add-ins, and the portion sizes—making them a healthier snack for kids and adults alike.
What ingredient holds granola bars together?
In homemade granola bars, it’s all about the combination of sticky sweeteners (like honey, maple syrup, or date paste) and nut butter. They coat the oats and nuts, then firm up in the fridge to hold everything together. Using the right ratio of wet to dry ingredients—usually about 1 part wet to 2–3 parts dry—keeps your bars chewy, not crumbly.